Simple Sump Assembly
If you want to try your hand at building your own sump, I'd recommend doing something small at first. Take your time and do a good job so the floors stay dry. If you opt to build something big, make sure you know what thickness of material you need to use before you start construction. Here's a simple sump based on the Model A that I used under my 29g reef years ago.
It is made of 1/4" AcryLite (Acrylic), and glued (bonded) together with Weld-On #4. Weld-On actually melts the acrylic into one piece, so it is important to use it the full length of any joint, and watch out for bubbles / air pockets. Silicone will not work, because it can't adhere to acrylic like it can to glass.
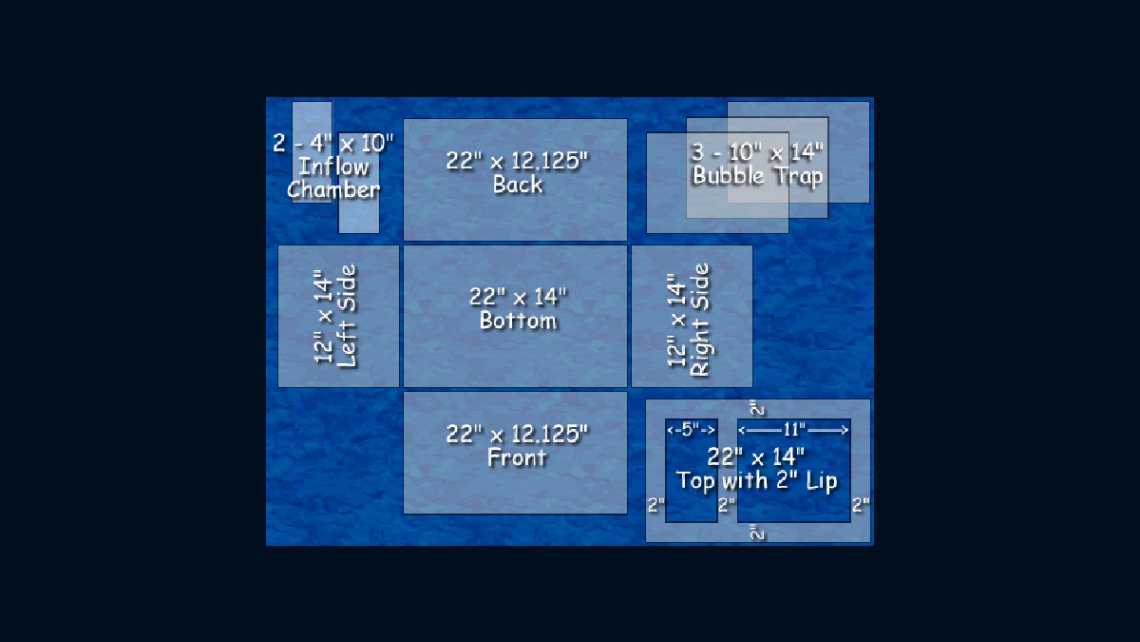
I measured the opening in my stand, and figured I could fit a retangle 22L x 14D x 12T (all in inches). After I knew the exact size of each piece, I cut them all on my little Black&Decker table saw, with a 7 1/4" circular saw blade with 80 teeth. Raise the blade as high as you can, so that as you push the acrylic through the blade, only the teeth will touch the material at the front and back edges of the blade, reducing any melting of the plastic. Also, leave the protective paper on the acrylic for as long as possible, even during most of the gluing stages (except the bubble trap, because you will have no room to remove it later).
Peel back a little of the protective paper along the edges you are about to glue. This will also prevent getting glue on areas where you don't want it. Each joint MUST be glued together horizontally, so put the first piece on a smooth level surface, and position the next piece where it goes. Using Weld-On #4, wick the solvent into the seam (or joint) with a needle-tip applicator . Specifics about tools
Adding each piece in place, it bonds nicely. Remember to anticipate the sizes of the pieces. Example: My tank is 12" tall. But with each wall being 12" tall, once they are glued on the base, the sump becomes 12 1/4" tall. In this case, the four walls would need to be 11.5" tall, because when you add your base and the top flange, it will be 12" total. The side or end pieces need to be smaller to fit.. With the front and back pieces on the top of the base, the side pieces would be 11.5" wide, to accomodate the 1/4" for the front piece, and 1/4" for the back piece.
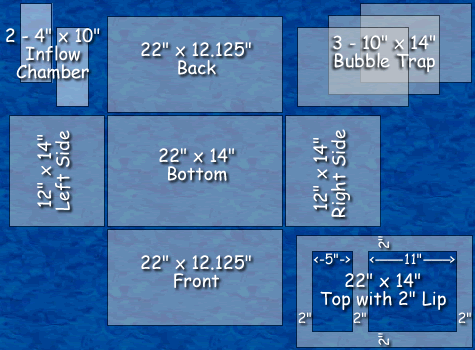
Btw, since my sump was small, and had a bubble trap in the center to help hold it together, it doesn't bow outward. However, I decided to glue an extra piece on the top as well, to keep it strong. You might decide to got with 3/8" thick material, or thicker.. It gets more expensive, but it will remain rigid and avoid bowing.
The plastic shop where I bought the stuff could make my cuts for me, but for the price they charged, I was able to purchase a full 4'x8' piece instead, and had extra for future projects.
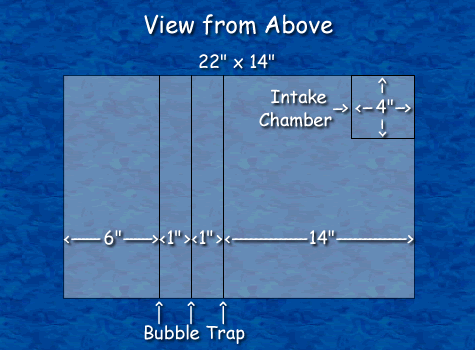
I decided I wanted my reef tank to drain into a small area of the refugium. It's only 4"x5"x10" tall, and filled it with LR rubble to control the air bubbles. I routed (straight 3/8" Laminate Trimming bit) small openings on both sides of this column, but of course water also goes out over the top of this section. That doesn't cause any problems for me. I still have nice, smooth, calm circulation in my refugium area, even though my tank & sump are cycling 10 times per hour.
After this was assembled, I let it stand for 24 hours before even attempting to add water to it. Then I filled it all the way up, and left it for another 24 hours, to see if it would spring a leak. It didn't, and I was ecstatic. Then I went on a 10 day vacation, so it had lots of time for the glue to cure. After 24 hours, you can route the edges around the sump to create clean smooth corners.
If you look closely at the Model A sump, you can see the triple baffle bubble trap in the center. Your first piece goes to the floor. The next one should be raised up about 1" from the floor of the sump, and then third one goes back to the floor of the sump. I solved my mistake by adding a 4th baffle, which took up a little more space in the return area, but all is well.
Depending on the size of the sump/refugium you want to build, try to leave enough room for several gallons of water to be in the return area. Mine holds approximately 4 gallons to the top of that section, but I only keep about 3 gallons in there. As evaporation occurs, that section will gradually lower, and I'm topping it off with a gallon of fresh RO/DI every other day. So if you have the space, increase that section to hold as much as 10 gallons or more, so you don't have to watch it as closely, and can take a 3 or 5 day vacation without worrying. Or build an automatic top-off system to replenish the water each day. :)
Click for DIY plans to build your own overflow, including description.