- Raising Alkalinity: How to bake baking soda
-
Raising Alkalinity requires you to dose Sodium Carbonate. The best value is to use Baking Soda, the same stuff you use to bake cookies, or remove bad odors from the fridge. Arm & Hammer Baking Soda is inexpensive, available at the supermarket and simple to prepare. Right of the box, it is Sodium Bicarbonate, but if you used it 'raw' it would lower pH while it raised alkalinity. What you want is Sodium Carbonate, aka Soda Ash, because it raises alkalinity and pH simultaneously. To make your own Soda Ash, all you do is spread out a box of baking soda across a cookie sheet, place it in an oven at 300°F for an hour, and that will drive off the trapped CO2 in the product. Allow it to cool, and place it in a sealed container until you need to use it.

If you want to make a gallon of solution, 2 to 2.25 cups per gallon of RODI water would be the proper strength for a dosing system, be it manually or with a dosing pump.
If you wanted to raise alkalinity in a batch of fresh saltwater, roughly 1 tablespoon per 10g of water should raise the saltwater's dKH by 1 point. Your mileage may vary. Always mix up the soda ash in a glass of water, stirring it well until it looks clear. Then pour it into an area of high flow so it mixes into the full volume of saltwater, and retest in a few minutes to see if you've reached the desired level. It's always best to under-dose and add more until you learn how much you'll need exactly.
Note: Do not buy Baking POWDER, you want Baking Soda.Read more here: http://reefkeeping.com/issues/2006-02/rhf/index.php
- AEFW - Removal with RODI water
-
I learned this trick from Joe Yaiullo and his 20,000g reef: Turn off all the pumps in your display tank to cease any flow. Using a bowl of RO/DI water and a turkey baster, baste some RO water over the coral where it is in your reef. It will react like oil & water, visually. Any AEFW will peel off the coral and enter the water column.
When I did this in my own reef, I had a Lyretail anthias that partnered up with me. She'd watch closely, as soon as one floated into the open she'd dart out like a grouper and gobble it up, and return to her perch to watch for the next snack.
After doing this for a minute or two, wave your hand back and forth in front of the coral to disperse the RO water and get saltwater back on it like usual. I focused on the corals that appeared to be affected, and then restarted my pumps again within 10 minutes or so.
You could do this daily or weekly until you've beaten them.
Joe's huge tank allowed him to literally bring in a garden hose and he'd 'spray' each coral with the trigger nozzle. Here's a great visual of him 'watering his reef'... he too doesn't like AEFW.
If you don't want to try this method, instead try a powerhead -- but it's more tedious. You'll need a Maxijet 1200 plugged into an extension cord. You are going to hold the Maxijet in your hand and point the nozzle at the affected coral. AEFW will hold on tightly, but the flow will make them peel off. They might fly off quickly if you're lucky, but I've had some hold on in a direct jet of water that lasted over 20 seconds. That's why it's a tedius task, because you have to work so slowly on a single spot for results. Once an area is cleared, move to the next spot and see what comes off. You want strong flow, but this isn't like pressure washing concrete. Don't put the nozzle right against the coral or you may damage the tissue.Acropora valida (tricolor acro) is the canary in the coal mine. I like having a tricolor acro in my reef, because if it's in trouble I know AEFW are an issue. They seem to love that coral like it's candy.
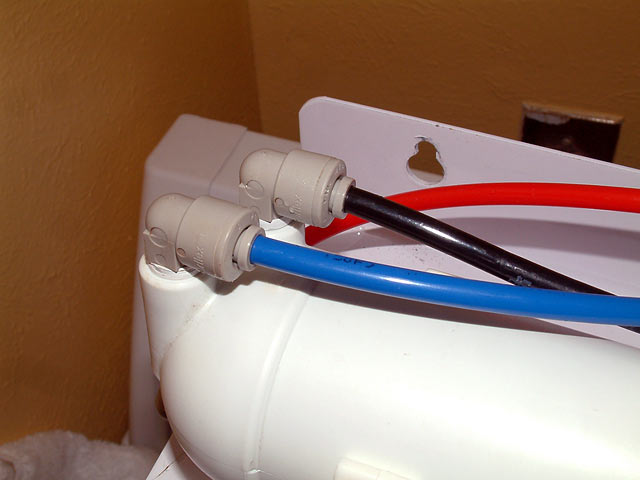
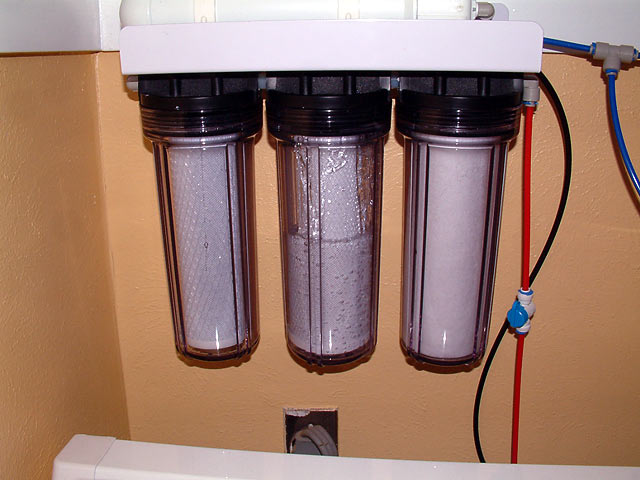
- RODI: What is the correct configuration for filters, the membrane and booster pump?
-
As you look at this image, you'll see how water enters the first housing which holds the sediment filter. From there, it flows through two carbon block filters, then to the membrane housing and finally the DI stage. The waste line must have a flow restrictor installed or the system will not function properly. Please refer to the other FAQ sections about filter placement and orientation, flow restrictor location, ASOV installation and more.
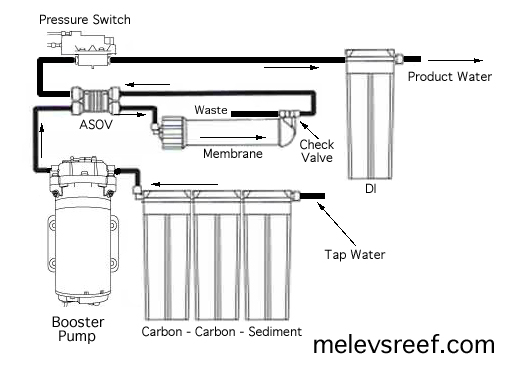
If the system uses a booster pump, the booster pump is installed before the ASOV and membrane housing since they are made of PVC and thus is much stronger to handle that pressure, unlike the prefilter acrylic housings that could crack. The booster pump pressure switch is installed after the ASOV (auto shut off valve) on the product water line (RO water). Once that line is closed off with a ball valve (not a float valve), back pressure builds up in the system which not only shuts off water going into the RO system, but also shutting off the power to the booster pump.
- Skimmer: What is the proper bubble height?
-
I always recommend that the bubbles boiling away should be level with the base of the collection cup, at least at first. As the protein skimmer pulls out waste, it will build up and rise up the vertical tube and spill over into the cup. This is a good starting point. Keep in mind that things you add to the water (oily food like PE Mysis) will collapse the foam in the skimmer body, and the weather outside shifts the barometric pressure which can cause a skimmer to overflow unexpectedly.
You can watch my protein skimmer video for a number of useful tips:
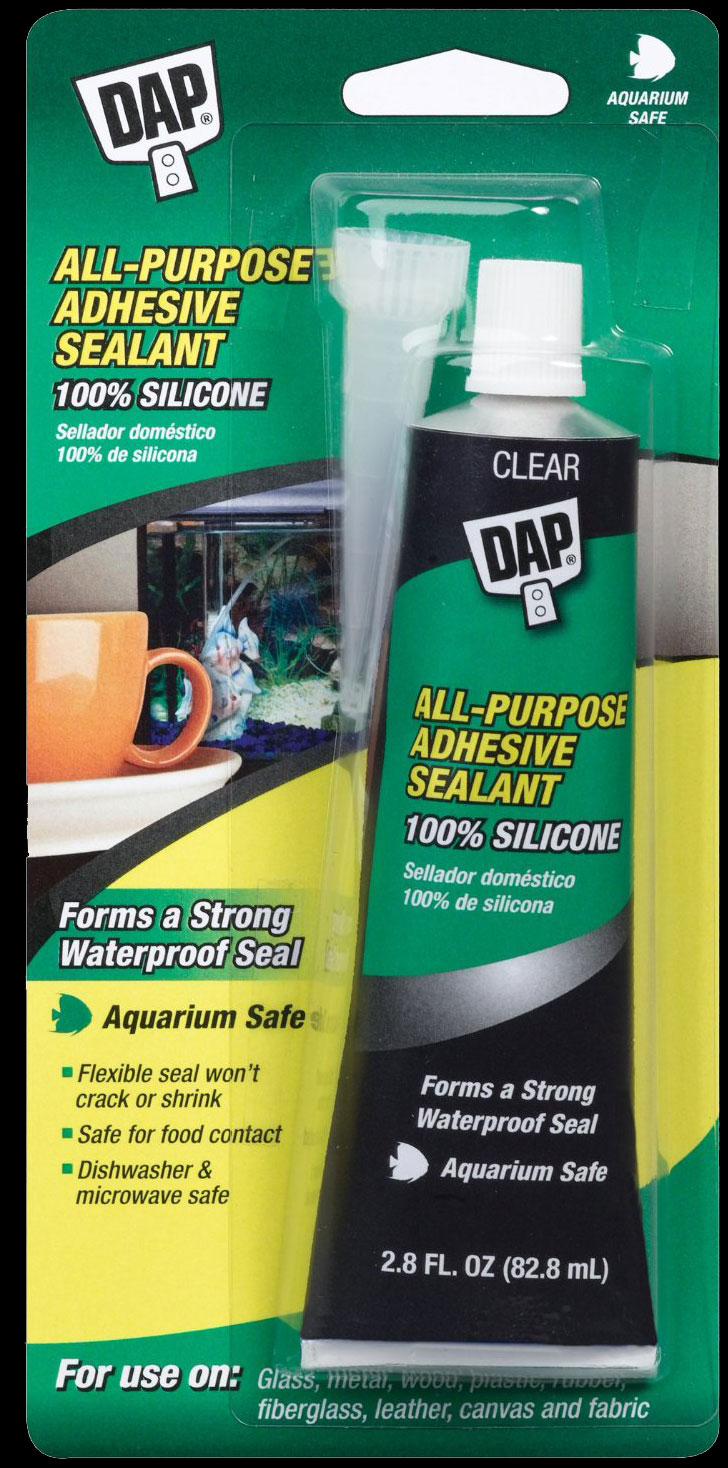
- Silicone: Which one is safe to use?
-
Home Depot sells a brand of silicone by DAP that is marked Aquarium Safe right on the packaging. It's a squeeze tube, so you can get into narrow spots with it. It costs about $5.
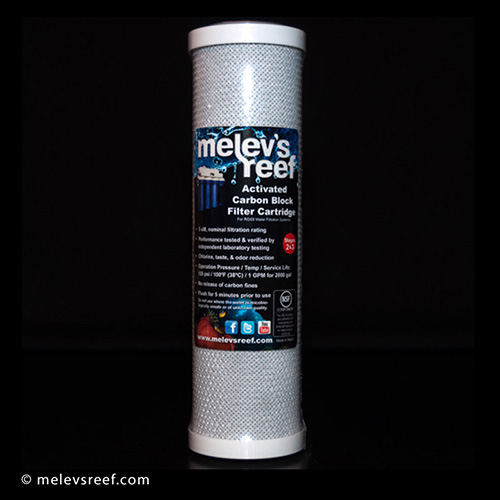
- Carbon: How much should I use?
-
The quick answer is half a cup of Granulate Activated Carbon (GAC) per 50g of aquarium water in a reactor. Here's my video:
- Cyanobacteria: How do I treat my tank?
-
If you are using Chemi-Clean or RedCyano Rx: To treat your tank with best results, it would be best to siphon out as much of the cyanobacteria out of your tank first. Reducing the volume of red slime from the aquarium helps avoid issues. Be sure to point one powerhead at the surface to get strong rippling, which improves oxygenation of the water. Plugging in an air pump and airstone to add oxygen to the water is another good idea, especially in tanks with low flow.
Turn off the protein skimmer, and stop running carbon and GFO. The tank can be treated day or night, and all of your livestock is safe. While the tank is being treated, start mixing up new saltwater because a big water change is next. After 72 hours, check the tank and if the cyano is gone, do a 25% or larger water change. If cyano is still present, wait another 24 hours. If it is still present, treat the tank again. Once the cyano is gone, do the big water change. The bigger the better because the product will cause protein skimmers to overflow initially. Adjust the skimmer to the lowest water level in the body, and as the collection cup fills with watery skimmate, toss it out. Keep tossing out skimmate and replenish the system with more saltwater. (You could even fill up your ATO reservoir with saltwater for this instance to replace what is lost via the skimmer, but once you are done clean it out and fill it back up with the usual RO/DI water.) After a few hours, the skimmer should settle down finally. If microbubbles are getting the best of you, put a filter sock on the output of the skimmer for the first day.
- RODI: How long is my warranty?
-
Melev's Reef makes no claim to the suitability of this product for any specific use. The end user is solely responsible for determining fitness for a particular use, and for installation. This product is sold as a component of a custom aquarium installation.
Your product is warranteed to be free of defects for a period of one year from purchase. We will, at our discretion, repair or replace your product at no charge during this period. Return shipping is the responsibility of the purchaser. This warranty does not cover accidental damage, misuse, improper care or alteration, or acts of God, such as floods and earthquakes. Coverage terminates if the original purchaser sells or otherwise transfers the product. This warranty excludes claims for incidental or consequential damages, loss of revenue or profits, loss of business, or other financial loss in connection with the warranty problem. Some jurisdictions do not allow the exclusion of limitation of incidental or consequential damages, so the above limitation or exclusion may not apply to you. This warranty gives you specific legal rights, and you may also have other rights, which vary from state to state or country to country.
- RODI: The unit stopped producing pure water.
-
Over time, you may observe that your RO system takes longer to produce water. A 100gpd system should produce 4.16gph under optimum conditions. (When the source water is colder in the winter months, production rates will drop significantly. 50° F will reduce a membrane's rating by 50%; a 100gpd membrane will only produce 50gpd until the water warms up again.) If your RO unit no longer produces any water, if it only drips out, if it takes hours to produce one or two gallons, the membrane could be the cause. However, before you resort to a membrane replacement, check these first:
Disconnect the tubing after the membrane (prior to the DI) to see if water comes out of the product line, to assure the DI section isn't the problem.
1) If the flow restrictor has fallen out or was lost, water will only run out the waste line. The flow restrictor is an important fitting, inserted fully into the waste line prior to being pressed into the John Guest fitting on the housing. If you are missing the flow restrictor, try to find it. It may have dropped out when you were replacing the membrane and/or disconnecting the tubing.
Another thing that happens is that the customer changes out the tubing for a longer piece, not realizing they didn't insert the flow restrictor back into the tubing where it was originally. If you changed out the tubing, check the section you removed for it, and install it in the longer tubing.
If you don't have a flow restrictor, a temporary solution is to install a ball valve on the waste line. Close the valve to apply back pressure, which should start producing pure water. Through trial and error, you can adjust the ball valve until you reach a 4:1 ratio. Using two 2-liter bottles, you will want the waste water bottle to be full to the top, and the pure water bottle should be 25% full. Readjust until you achieve this correct volume. You can order a replacement flow restrictor here.
2) If the DI cartridge is installed upside down, no water can exit the good (product) line. There is an arrow on the side of the DI to show you which way is up, which is also the direction the water should flow. Remove the DI cartridge, point it in the correct direction and reinstall.

3) Check to make sure your cold water source is working as it should, unobstructed. Make sure the tubing isn't kinked as well.
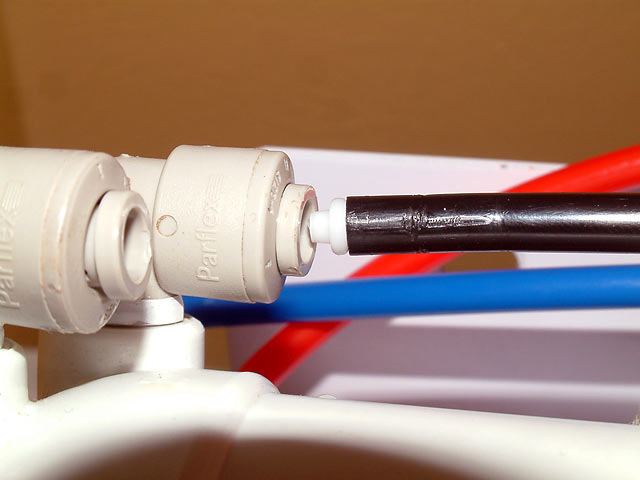
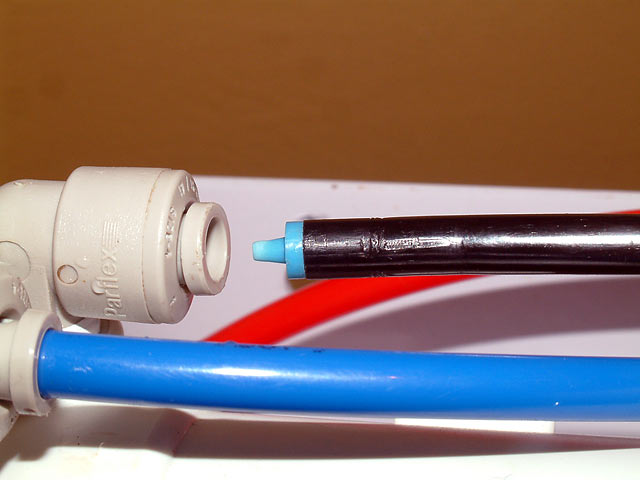
- RODI: Where is the flow restrictor located?
-
The flow restrictor is located in the black tubing, the waste line that is connected to the end of the membrane housing. It restricts how much water exits the unit, creating sufficient back pressure so the RO membrane can do its job. It is possible for the restrictor to clog or be pinched, but this is very rare. If you remove the black tubing for any reason, be sure you keep track of this little part. Below are several pictures of it, so you can see what it looks like and how far is should be installed in the tubing. Depending on the age of your particular unit, the flow restrictor may differ in color or design:
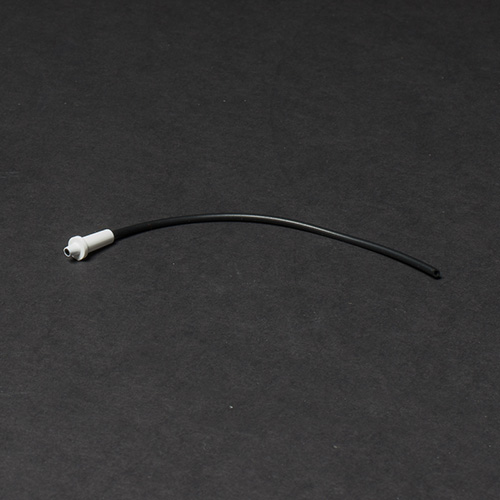
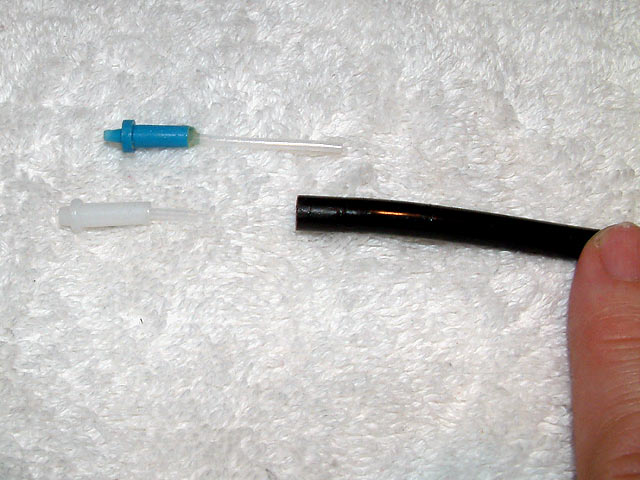
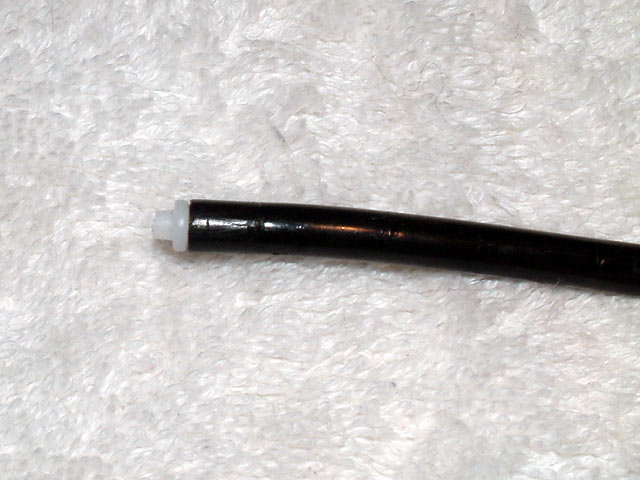
The flow restrictor must always match the membrane or production rates may vary greatly.
If you have this flow restrictor (pictured below), it should be spliced into the black tubing waste line, with the arrow pointing toward the receiving drain. Any other flow restrictor should be removed from the system first, as this is the replacement.
- RODI: I don't hear hissing and the system won't turn off.
-
Verify that the flow restrictor is in place in the black tubing. The flow restrictor produces that hissing sound as it provides back pressure, and if it is missing not only will the system not shut off, the RO system will cease producing pure water. All water will run out the drain line. In a pinch, install a 1/4" inline ball valve on the waste line and shut the valve enough to produce a waste ratio of 4 cups waste to 1 cup pure water. (4:1 is the standard ratio)
- RODI: What is that hissing sound?
-
When the RO/DI is on, the unit will hiss. That sound means water is going out the waste line. When the product line is shut off with the ball valve (on the RO or DI line - if you use one for each, both must be closed), the unit will pressurize and should stop hissing within 30 seconds. If it is still hissing, water is being wasted. Turning off the water before the unit is another option if it won't shut off correctly.
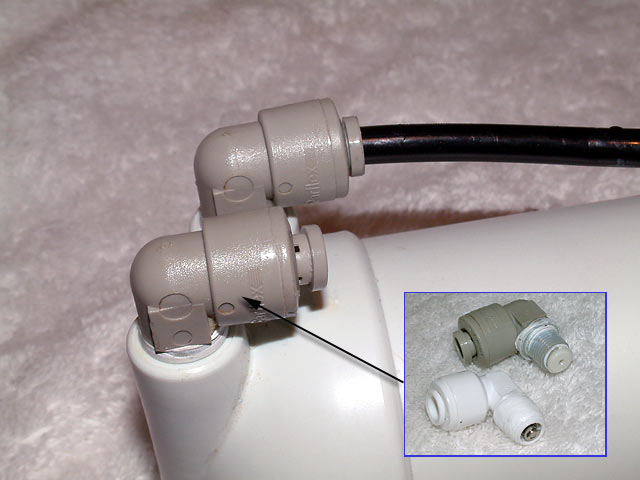
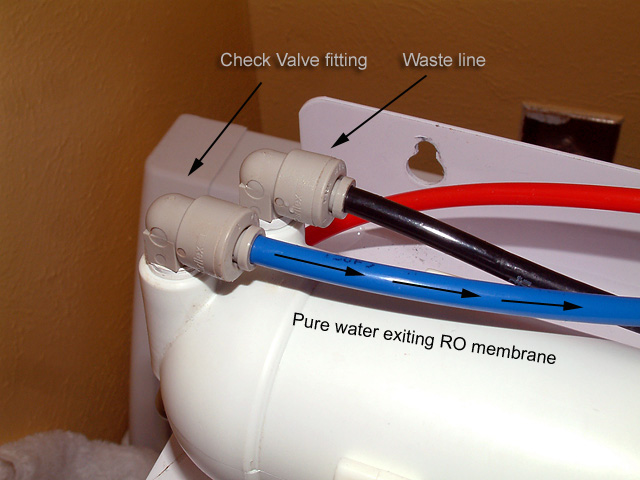
- RODI: What is the check valve for?
-
The check valve prevents water from going back into the membrane. This part can be replaced easily. Based on the age of the unit, they may look like one of the two pictured below (inset):
To verify that the check valve is still functioning properly, you'll need to unscrew it. Due to its close proximity to the other (waste line) fitting, simply remove the collet first, then unscrew the fitting counter-clockwise until it comes out.
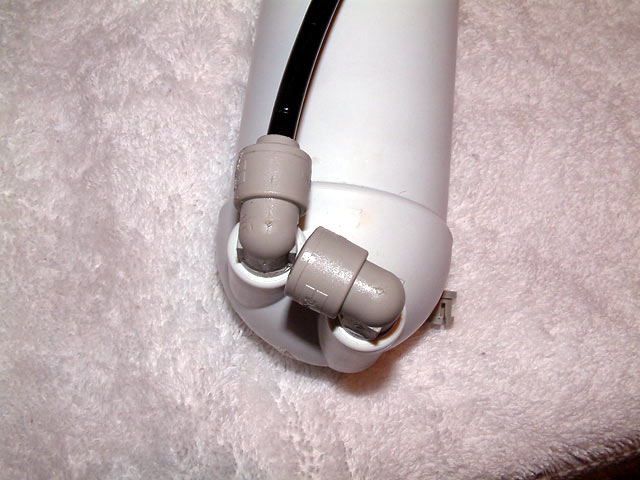
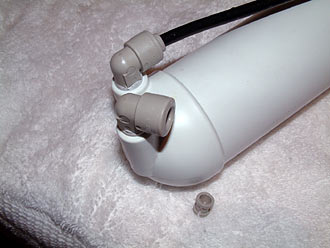
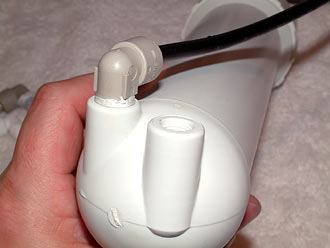
Once the fitting has been removed, blow on the end that the check valve is in. Air should flow through it. Blowing on the end (where the tubing was inserted) should not allow air to pass. If air only flows one way through the check valve, it is working as it should. Reinstall. If you need a new one, contact me and I'll be happy to send one out immediately. This part is available here: http://melevsreef.com/product/18-elbow-fitting-with-check-valve
- RODI: Do I need a flush kit?
-
Adding a flush kit will void your warranty. The purpose of a flush kit add-on is to rinse water across the membrane quickly, to wash away buildup. If you decide to forego the warranty and install a flush kit, remember to only run it for 15 seconds, monthly. Leaving it in flush-mode for any longer will ruin the membrane, so don't forget by leaving it unattended.
- RODI: Does water temperature matter?
-
Never use hot or warm water. Water coming from your water heater is laden with metals (check the bottom of your water heater sometime to see what has accumulated), and water over 110F will ruin a membrane in minutes. Always use the cold water line.
The ideal temperature is 76° F and yields the best results. During the winter months, source water comes out of the pipes much colder. If the water is 50° F, the gallons per day rating of a system will be cut in half. That means a 100gpd system will produce 50gpd instead because the colder water is harder for the membrane to process.
- RODI: Can the system be moved?
-
Yes, but it needs to be in a stationary spot for the most part. If you want to pull it out once a week to use it, the fittings won't last long because of the wear and tear. Make sure it is set up on a stable surface so it doesn't topple over.
If you plan to move out of your current home and want to take it with you, you can. It is designed to be mounted on a wall or cabinet, and isn't something you have to leave behind some day.
- RODI: Can I run the RO system outdoors?
-
RO/DI systems are designed to be used indoors in room temperature conditions. Summer heat and winter cold will do damage. If you can not keep it installed indoors, insulate it carefully to protect it from damage.
In the summer, direct sunlight will lead to algae issues as well as risk of bacterial growth within the system. Installed in a well shaded spot will help.
During the winter months, many outdoor RO systems suffer damage by freezing, cracking housings, bursting fittings, and rupturing the membrane. Turn off the water, drain the housings and hope for the best, or bring it inside until the temperatures rise above freezing.
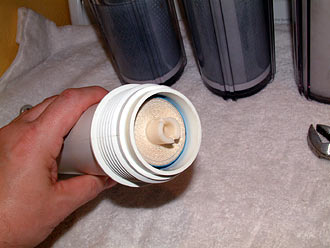
- RODI: How do I change the membrane, and when?
-
The membrane, the heart of the system, is good from one to five years. Water quality in your area directly affects that lifespan*, and I sell replacement membranes.
Some areas have softer water, while others quite the opposite. Source water that measures less than 300 TDS is best; anything higher is harder on the system. Measuring the source water's TDS levels can provide some idea of the conditions you are dealing with. The higher the TDS, the harder the membrane has to work, and decreases its life. Lower TDS-laden water is always better. Keep in mind that those numbers may vary throughout the year, affecting the way your RO system works.
1) Turn off the water going into the RO/DI system.
I installed an extra ball valve (available in my reef shop) in the cold water (red) line, to make it easier to shut off the water. My connection is behind the washing machine, and honestly I'd rather turn off the water to the entire house than try to get behind the washing machine. Thus this little modification made my life much easier. PLUS if you go on vacation, it might be wise to turn off the water going to the RO unit to avoid a potential disaster.
2) Open the valve after the DI to release the pressure trapped in the system.
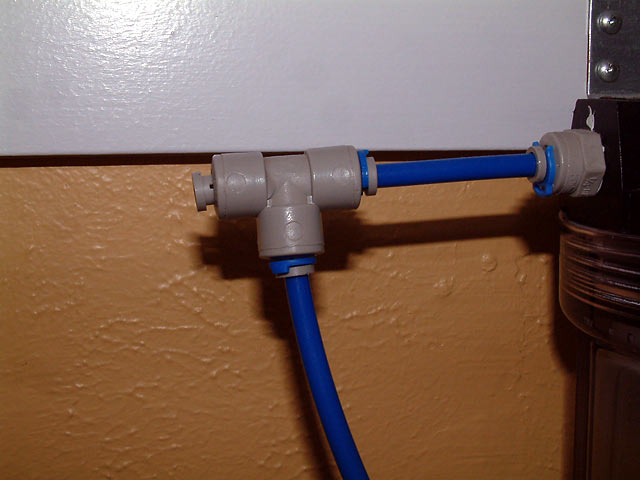
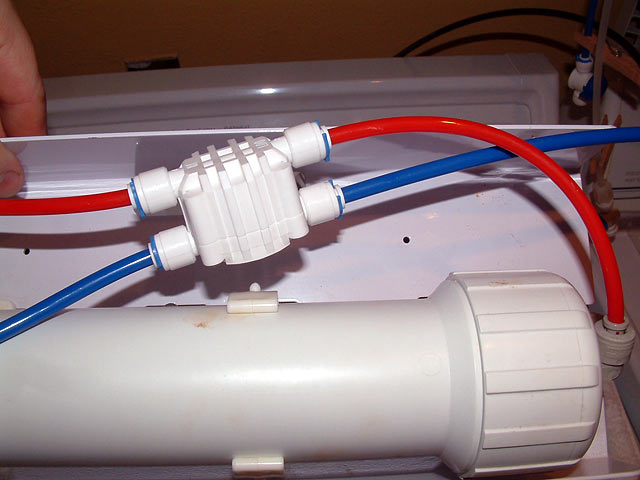
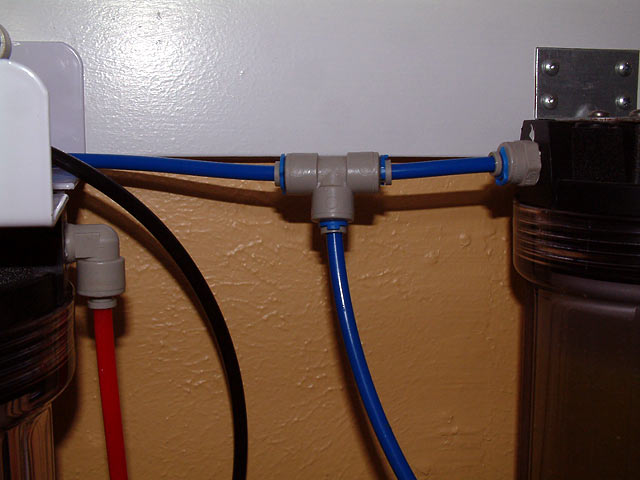
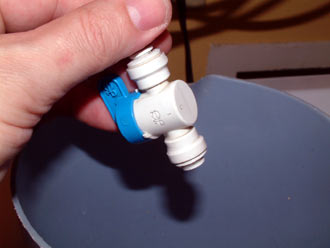
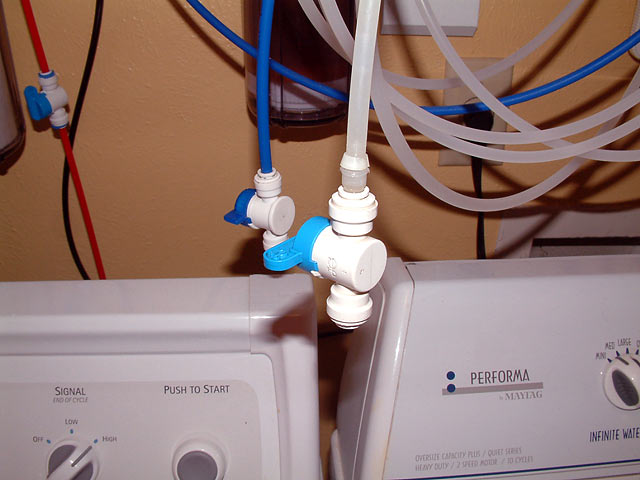
3) Remove the blue tubing leading to the Tee fitting (pictured below) to avoid possible damage to those fittings.
4) Remove the main RO unit from the wall.
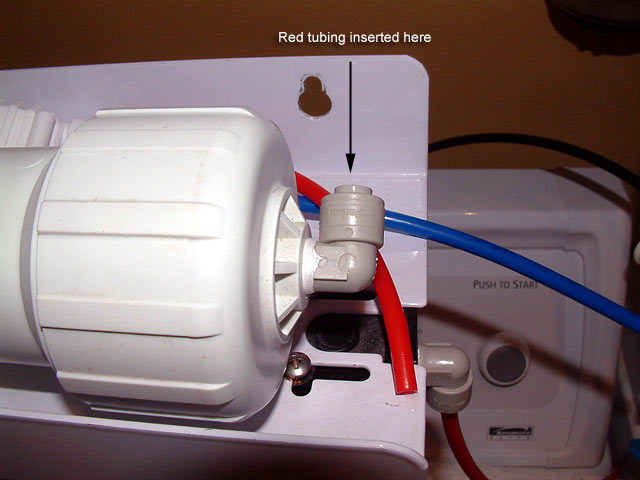
5) Disconnect the red tubing going into the right side of the RO membrane housing.
6) Disconnect the blue tubing going into the left side of the RO membrane housing.
7) Disconnect the black tubing, being careful not to lose the flow restrictor located in the end of the black tubing.
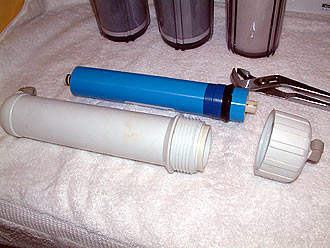
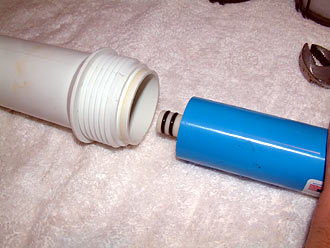
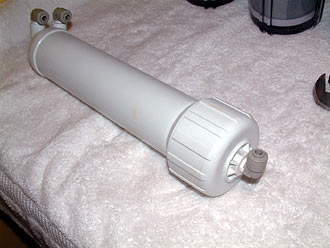
8) Carefully remove the white membrane housing from the clips affixed to the metal bracket.
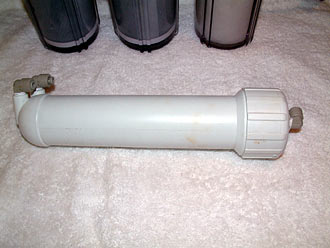
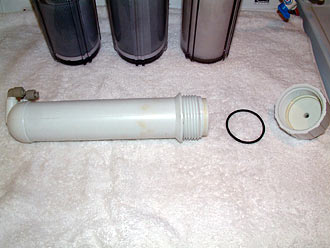
Opening the housing may be difficult. Soaking the right end in hot water for a few minutes may help. Large channel lock pliers and a helper is another option, or use strap wrenches. Once the cap is unscrewed, access to the old membrane is now possible.
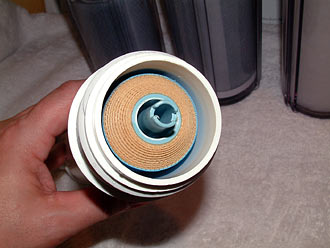
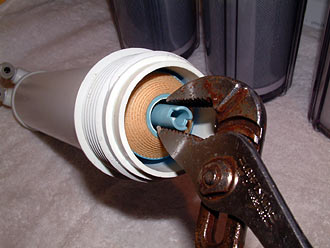
9) Using pliers, grip the plastic center rod carefully and gently pull the membrane out of the housing.
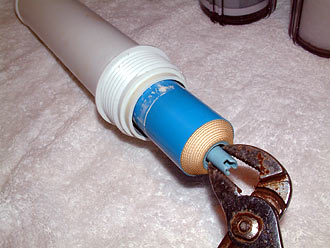
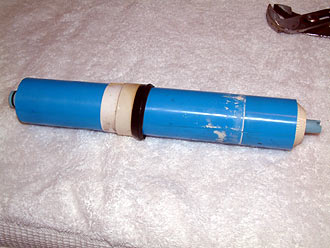
The above membrane was in my own RO/DI for over 5 years. The membrane was 'telescoping' to the left as water forced its way through, so much that it forced the black rubber gasket down the body of the membrane!
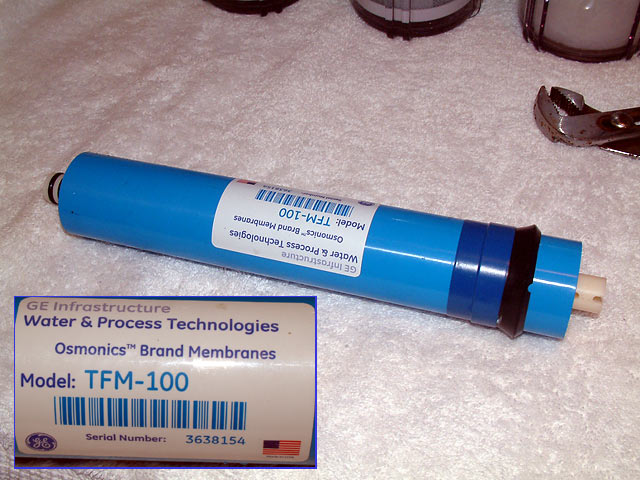
Next, open up the new membrane packaging, and verify that the new one and the old one match both in look and in length. If the membranes are off even by a 1/4" in length, it may not work in your system. The one I sell is the correct one for this system. (Pictured is an older membrane brand; I now offer the CSM brand.)
10) Insert the new membrane with the double black orings end going in first.
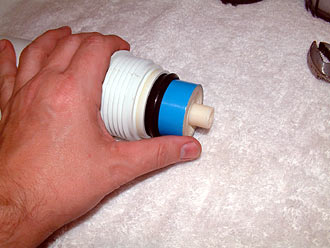
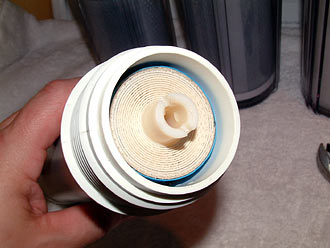
Do not force the membrane in. It should slide in easily. If some help is necessary, a little cooking oil on the orings as well as the black rubber gasket will allow it to slip in without damage to the membrane. If the membrane telescopes as it is inserted, it is being damaged.
Press it in fully so it is completely seated in the housing. Don't hammer it in. Making sure the large black O-ring is in the cap, screw it back onto the housing hand-tight. No wrench is necessary.
11) Reinstall the housing on to the RO system's metal bracket.
12) Reconnect the red tubing to the right end of the membrane.
13) Reconnect the blue and black tubing to the left end of the housing. Make sure the flow restrictor is still inside the black tubing as you press it into the fitting.
14) Reconnect the blue tubing to the Tee fitting leading to the DI section.
15) Turn on the water going to the RO system. Check system for any leaks.
Let the unit run for about one hour (5 gallons worth) to wash out the food grade preservatives, but not through the DI resin. The system is now ready to be used again, and the new membrane should last one to five years. It should last several years, but some areas of the U.S. simply destroy membranes at one year unfortunately.
- RODI: Where can I buy a hosebib connection?
-
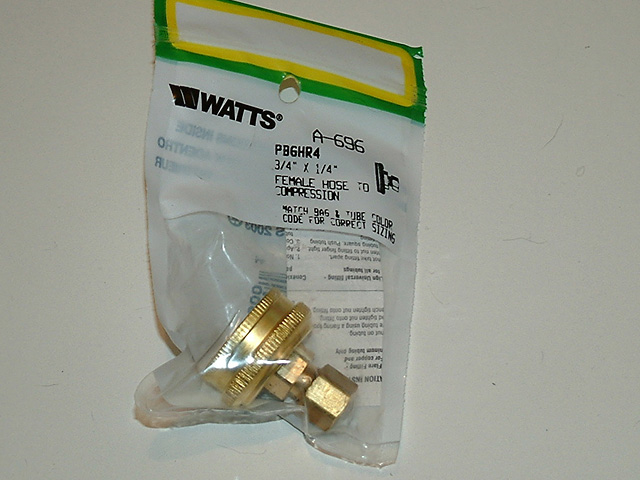
Home Depot sells all this item in the Plumbing Department. Look for the section where tubing is sold, and you'll find 1/4" tubing, Speed Fit ™ (aka John Guest) fittings, and brass compression fittings like the hose bib connector (part A-696):
You will need to install on the hose bib (garden hose-type) threads, screwing it on as tight as you can by hand, just like you would a garden hose to a outdoor bib. Slide the nut and ferrule over the end of the red tubing, press it into the hose bib connection's compression side. Slide the ferrule and nut down to the brass threads, and tighten it with a small wrench until it is tight. The tubing will be held in place by the ferrule, which was deformed as it was compressed by the outer nut. It will crimp into the tubing, holding it fast. Turn on the cold water and check for leaks. If you see a small drip, tightening the nut a fraction more should stop the drip.
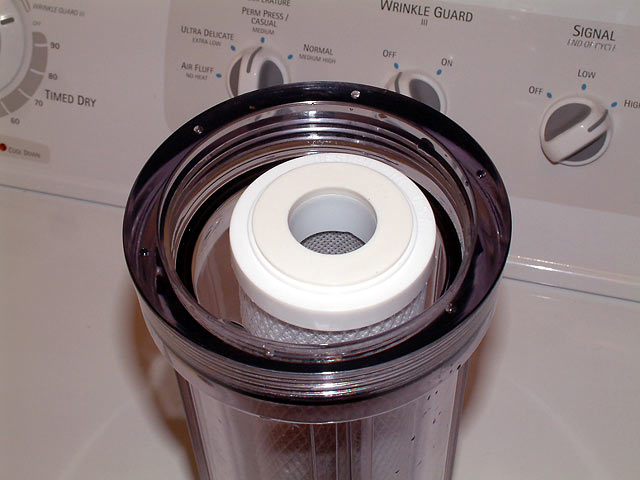
- RODI: What if the DI isn't filling all the way up?
-
New DI filters take time to get saturated. I've personally observed it taking as long as two weeks until the DI section stays full. Don't worry, because the water can only get out one way - through the media and it will be de-ionized.
If the DI media cartridge is installed upside down, that needs to be corrected immediately. The side of each cartridge has an embossed arrow designating straight up, and the black flat washer should be at the top when installing it. See pictures below.
- RODI: How do I replace the ASOV?
-
If you have to remove the ASOV for some reason, here is how it should be reconnected:
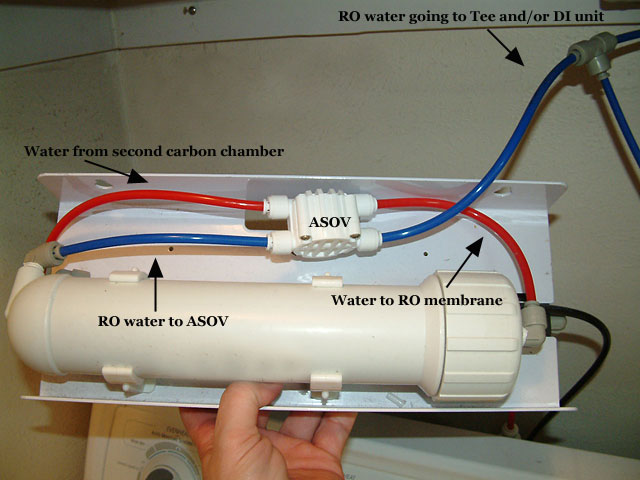
Even more detailed:

The ASOV (the white thing with four fittings) is marked clearly with IN and OUT on the side opposite where the screws are located. Please look closely at the pictures above to avoid hooking it up backwards. Mark the tubing prior to disassembly to avoid mixing up the lines. Take pictures with your phone. The ASOV needs to be installed the same way the old one was, with the four screws facing the same direction.
It is very important that the flow restrictor not be lost. You can find that entry in the FAQ section.
- RODI: The unit isn't turning off automatically
-
Trapped air solution: With the water to the unit turned on, open up the valve after the unit (the one producing pure water), then tilt the main unit at a 45 degree angle and hold it for 20 seconds. Lower it back to level, and then lift up the opposite side and hold it at a 45 degree angle and wait 20 seconds to lower it back to level (or normal) position. This should purge any trapped air bubbles in the system and auto shutoff valve (ASOV). With it back in place, close the valve again and see if it shuts off after 15 - 60 seconds.
Leaking situation: If the system is unable to pressurize, it will not shut off completely. Search for leaks. Remember, a float valve is NOT an off switch, it will not apply constant pressure as you might expect, allowing a small of water to bleed past the rubber flapper which will make the RO system shudder back on. A ball valve is the only way to seal shut the output tubing completely.
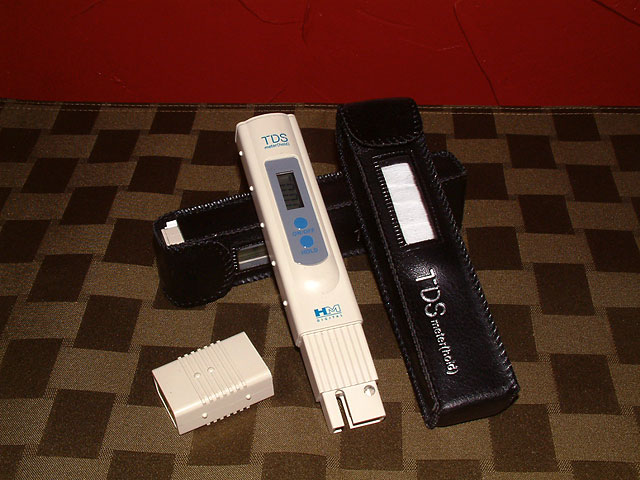
- RODI: How to measure TDS correctly
-
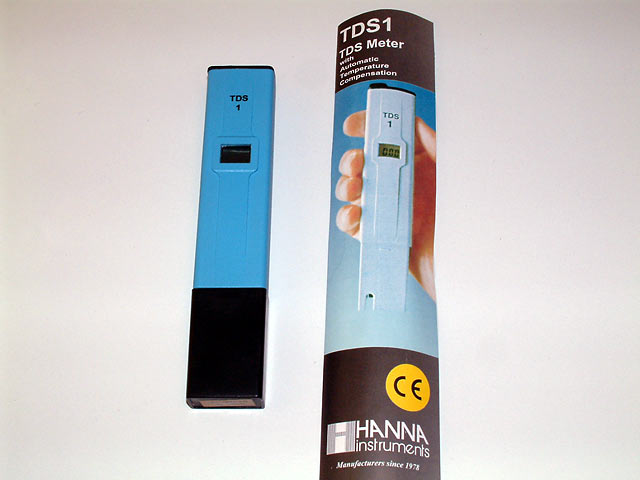
This is a TDS meter made by Hanna. I like having a handheld meter, as I can test water anywhere necessary, even at a club member's home or at the LFS (local fish store).
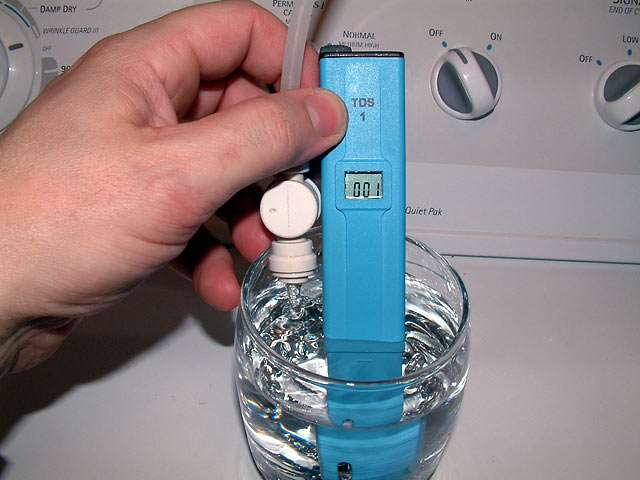
Let the water run for at least a minute before collecting a sample in a clean glass. Insert the meter and turn it on. The number on the display is the TDS (Total Dissolved Solids) in the water. This sample measures 1, and the DI is several months old. Our goal is typically 0 TDS, but anything under 10 should suffice.
The meter I sell has a Hold button. Once you've immersed the meter to measure the TDS, press Hold and now you can read the display without leaving it in the water. It also measures water temperature, but only in Celcius unfortunately. It comes with a protective case, as you can see below.
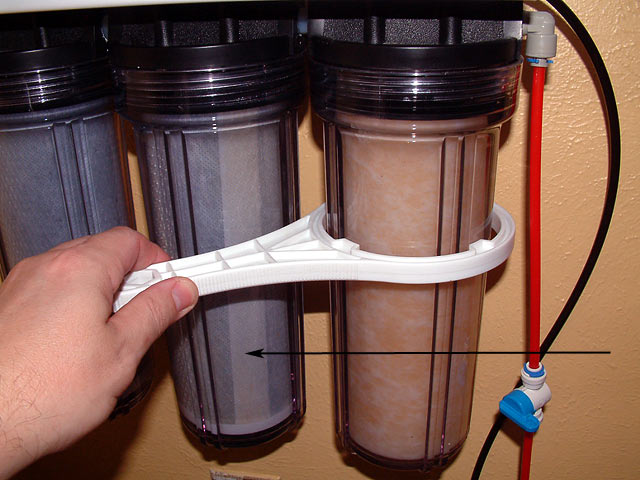
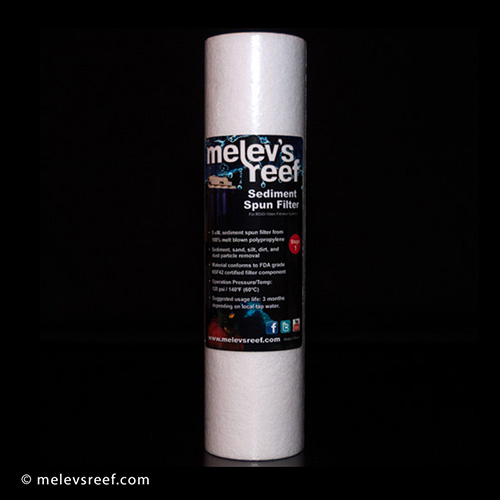
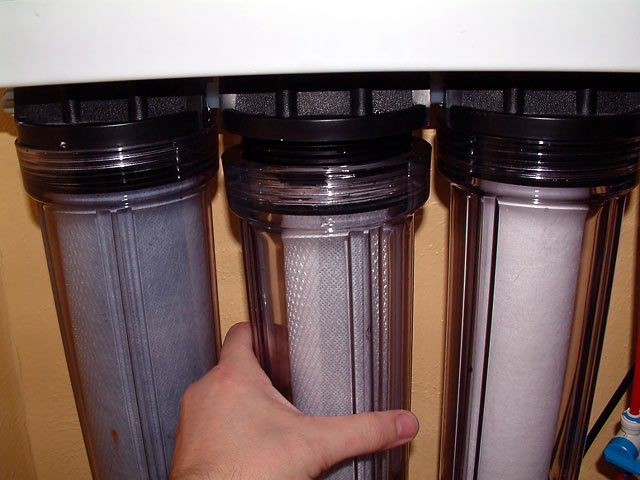
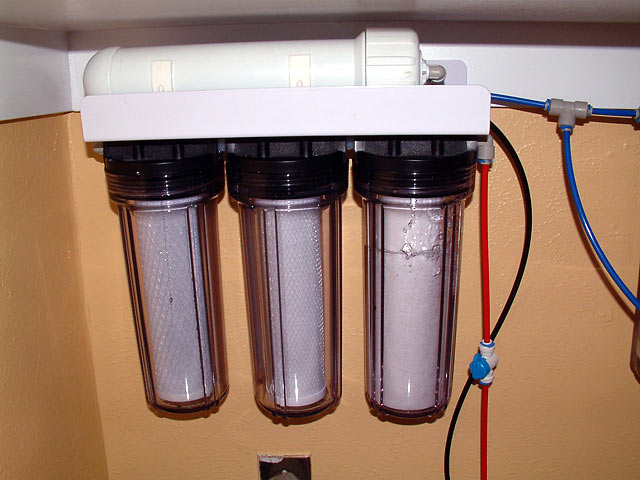
- RODI: How do I change the filters? How often?
-
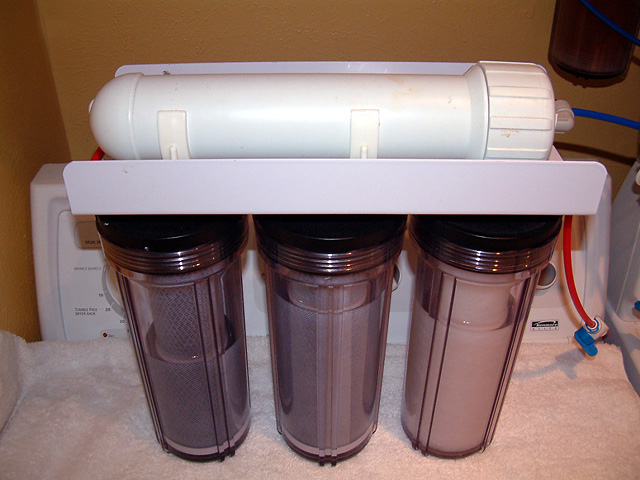
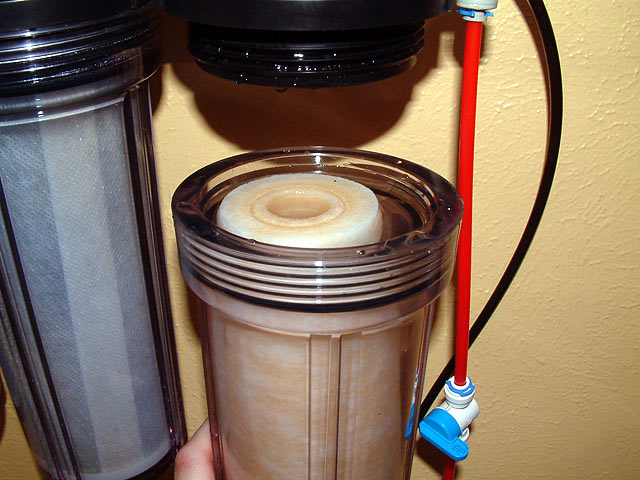
Every six months, it is recommended you change the filters in your RO/DI unit. By keeping up with this necessary maintenance, the production rates will continue at the desired level and the membrane is protected from chlorine damage. While you can visually inspect the filters for discoloration, it would be better to make a note of the date when the filters have been replaced. Typically if you use 125-gallons of RO/DI water per month, it's time to change the filters.
If you prefer to read, see below. :)
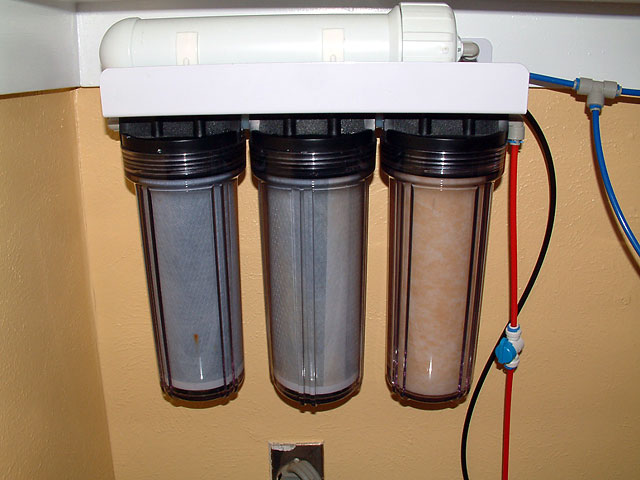
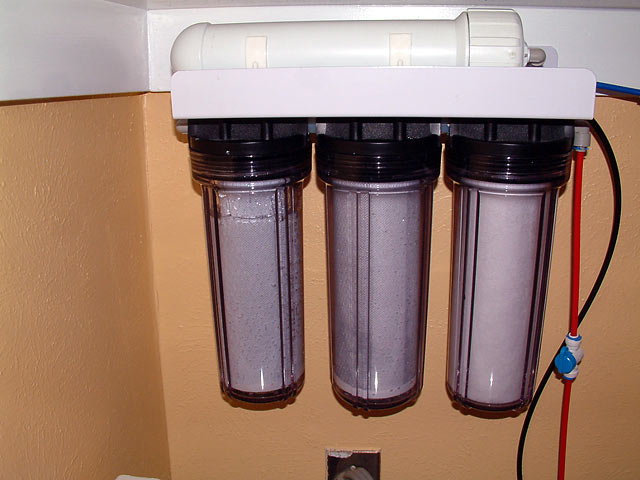
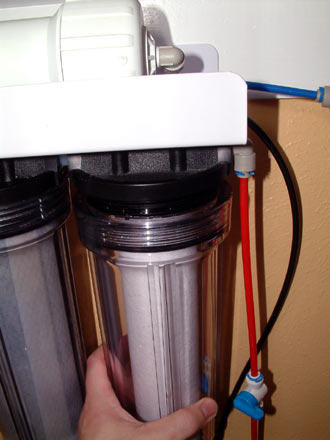
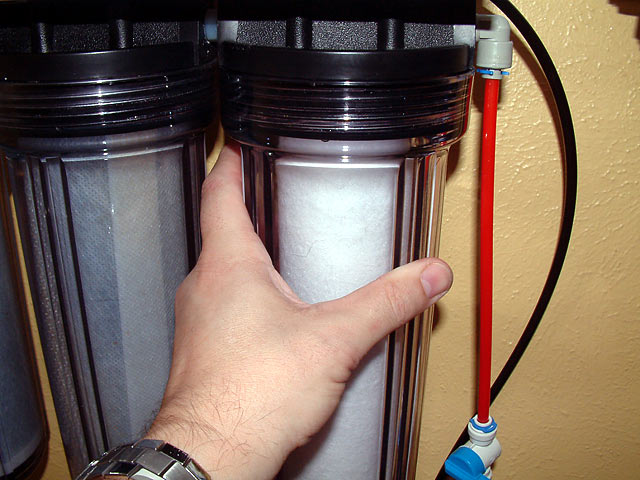
In this image, you can see how the sediment filter has changed from white to orange. The carbon filters look relatively new, but should be replaced at the same time.
1) Turn off the water going into the RO/DI system.
I installed an extra ballvalve (available in my shop here) in the cold water (red) line, to make it easier to shut off the water. My connection is behind the washing machine, and honestly I'd rather turn off the water to the entire house than try to get behind the washing machine. Thus this little modification made my life much easier. PLUS if you go on vacation, it might be wise to turn off the water going to the RO unit to avoid a potential disaster.
2) Open one or both valves after the RO unit to release the internal water pressure.
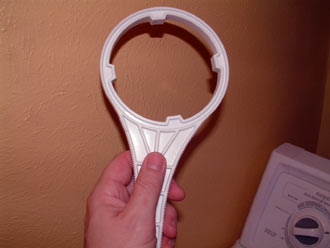
3) Find the housing wrench that came with your unit.
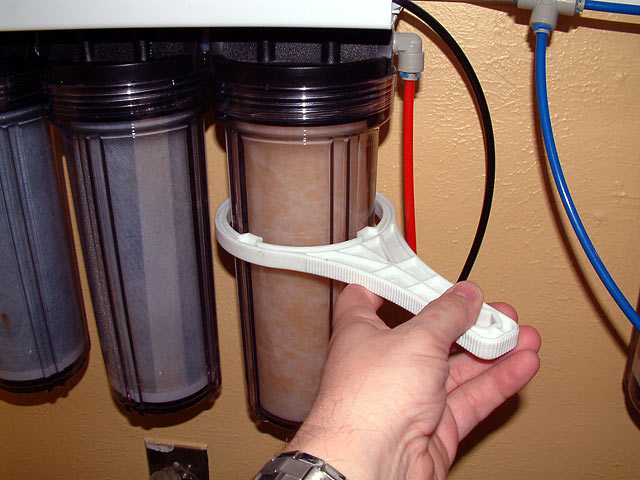
4) Slip wrench around acrylic housing, with the handle pointing to the right.
5) Firm, steady pressure should be used when pulling the handle toward the left. This should be enough to break the seal, without breaking the wrench itself.

6) By hand, unscrew the housing being careful not to spill the water within.

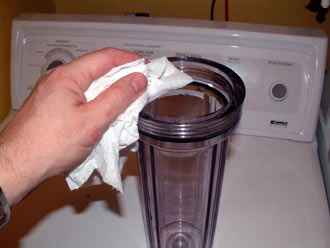
7) Remove the filter, and dispose. Wipe the housing out with paper towels.
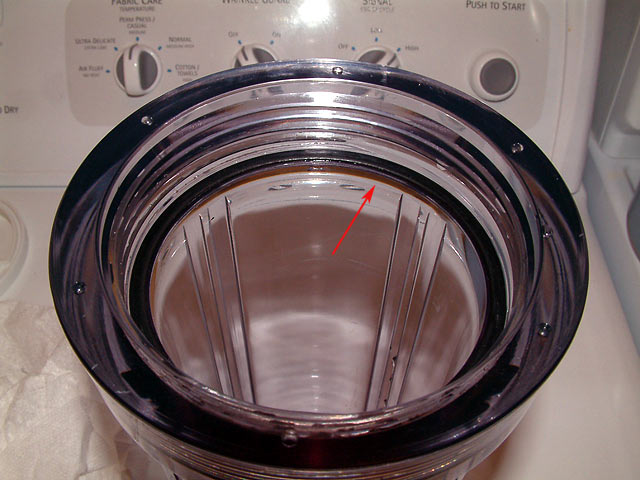
8) Make sure the black O-ring is in place before proceeding.
9) Unwrap sediment filter.
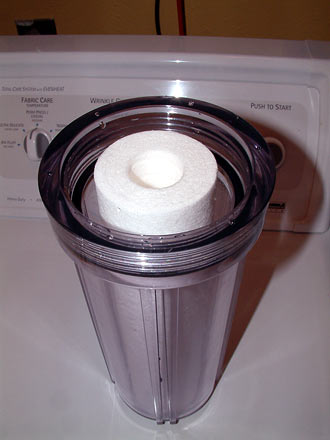
10) Insert new filter, making sure it is centered within the base of the housing. Screw back onto the RO/DI unit
Only tighten by hand. Do not use the wrench, this is unnecessary.
To replace the carbon filters, repeat steps 4 - 8 as explained above.
11) Unwrap carbon cartridge.
12) Make sure the flat rubber washers are in place at both ends, and center the cartridge in the housing.
13) Align housing and screw back in place, only hand-tight.
#14) Turn on the water source, and watch as the unit refills.
#15) Check for any leaks, and tighten housing if necessary, hand-tight.
#16) Close ball valves on the output lines. The unit will pressurize, and shut off automatically. It will be silent at that point. With new filters, as an additional precaution, it would be wise to make 2-3 gallons of water and then dispose. Now it is ready to produce pure water.
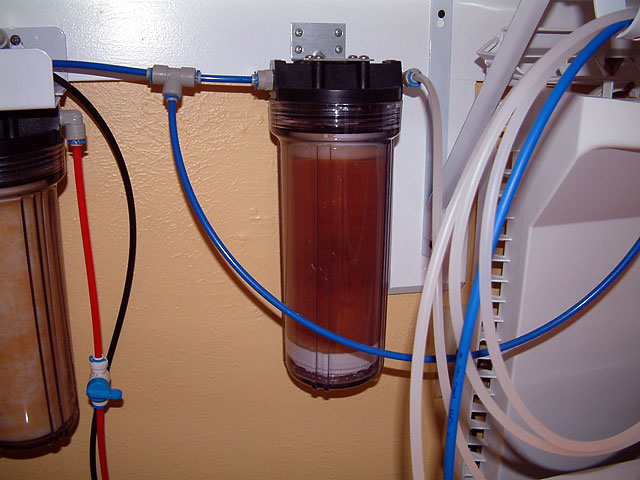
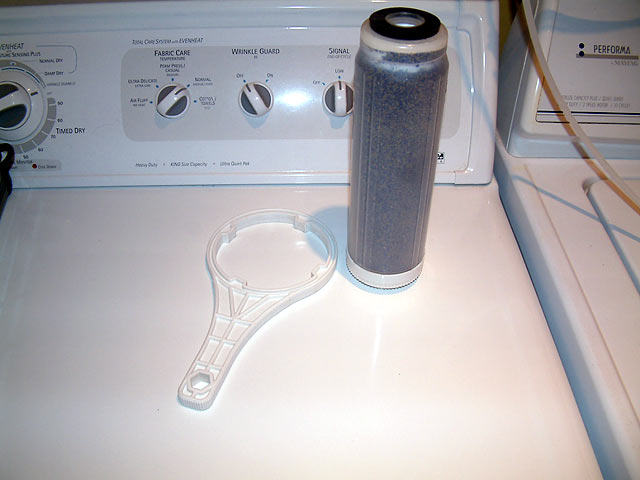
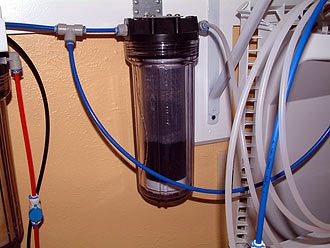
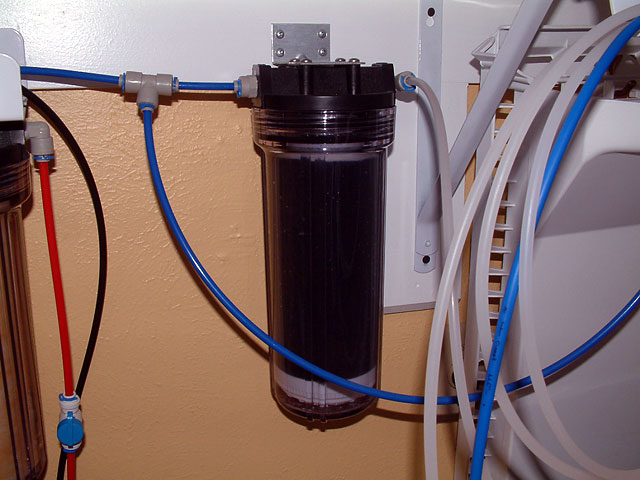
How to change the DI cartridge
This is a fully spent (used) DI cartridge. The best way other than looking for color change is to test the water before and afterthe DI for TDS. If the TDS is equal to or higher than the RO water, the DI is done. Many choose to change the DI as soon as any TDS appears on their meter, but anything under 10 is still good to use. I prefer to change it when my meter reads 3-6 TDS.
You will need a new DI cartridge and the plastic wrench.
Following the guidelines as stated above, shut off the water to the unit, and open the ball valve after the DI to bleed off any pressure. Carefully slip the wrench around the acrylic housing with the handle pointed to the right. With even pressure gently untwist the housing (pulling the handle towards your body and on to the left) from the upper section screwed to the wall. This can be somewhat difficult, so use care not to rip the DI section right off the wall. Steady pressure should loosen it without damaging the mounting bracket.
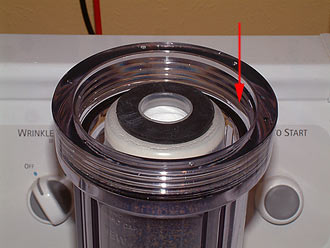
After removing the old cartridge, rinse out and wipe the canister out with a paper towel. Install the new DI cartridge with the arrow pointing up / the black gasket at the top. Make sure the O-ring is in place, seated in its spot at the base of the canister's threads. (Red arrow in picture below)
Carefully screw the housing back onto the upper section, and tighten well but only hand tight. You do not need to use the plastic wrench. Turn on the water and allow the DI to fill up.

Done. It is ready to use immediately. You do not need to let it run to rinse it out.
- RODI: Where can I buy more fittings or tubing?
-
I stock all those parts as well as additional accessories. https://melevsreef.com/reefshop/reverse-osmosis/parts
- RODI: The fitting is dripping. How do I fix the leak?
-
The tubing may be too long, and need to be trimmed to the correct length. If the tubing is too long, it may apply pressure against the fitting just enough to cause the connection to drip.
- RODI: Do you have instructions I can print out? I lost mine or never got them
-
Yes, they are always available from my site, linked to the matching RO/DI system sold on this site:
Melev's Reef 100gpd Installation Instructions - http://melevsreef.com/articles/100gpd-rodi-installation-instructions
Melev's Reef 150gpd Installation Instructions - http://melevsreef.com/articles/150gpd-rodi-installation-instructions - RODI: How do you collect the water?
-
I have a few 5g water cooler jugs. In the picture below, you can see the RO/DI tubing going into the rear jug. Once full, I move the output tubing to the next jug, and reset my timer. Each jug has a cap, which I snap back on the bottle to keep the RO/DI water pure. Open containers allow dust and other particulates to pollute the water. RO/DI water is like a magnet, attracting anything it can. Keep your containers sealed. From time to time, test the TDS of the water in the container to make
sure the bottles are still clean. Containers may grow slime within them due to ambient lighting, improper storage, putting dirty pumps in them, or using them to mix saltwater.If you need to clean your holding containers, use 10:1 bleach water. Rinse them very well, and then air them out for 24 hours. They should be ready to use now. Once the container is full again, test the TDS to make sure the reading is low or zero. I've never had to rinse out the 5g jugs because I always keep them capped - even when empty.
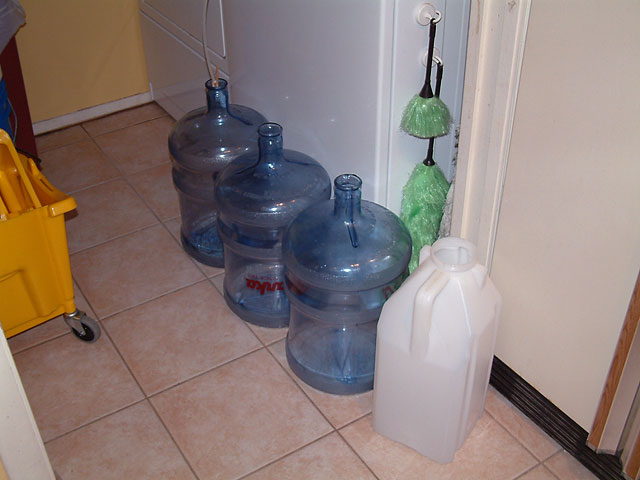
I set a timer to remind me to turn off the water once the jugs are full. This is very important if you want your floors to remain dry. Depending on the time of year, you will probably need to adjust the total minutes to match production rates. For me, it takes 80 to 85 minutes to make 5g of water in the winter, but only 55 minutes in the summer. The main reason for this is water temperature. The colder the water, the longer it can take.
Keep the timer near you. It won't do you any good if you can't hear it when it goes off!
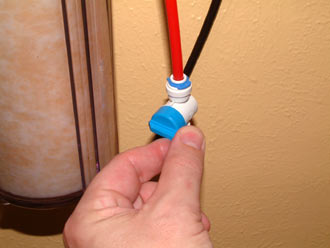
- RODI: How do I remove the (red, blue, black) tubing from the fittings?
-
Press the collet completely against the fitting with your thumbnail, then tug the tubing out gently. To put it back in, press the tubing into the collet fitting as far as you can, then tug gently to seat the collet.
- RO/DI: How often should it produce water?
-
To avoid stagnation issues, the RO system should be used once a week. It is best to run it once or twice for several hours rather than having it turn on 10x per day. The latter method wears out the membrane and depletes DI resin more quickly. Plan ahead and store RO/DI water for top off needs in sealed jugs.
If the information above doesn't help. Call our support center (682) 233-4284
We will reply as soon as we can.


