Steel Stand and Walkboard
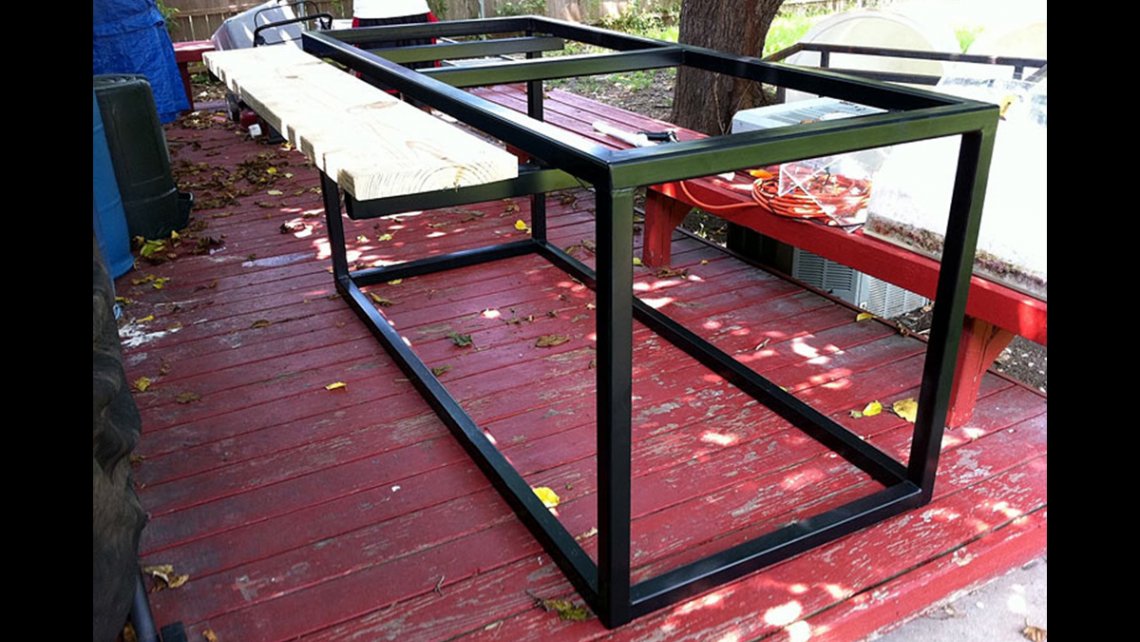
After years of using lumber to support my aquariums, I opted to free up space beneath the 400g with a steel stand. This one was designed to support the full weight of the tank, and it included a walkboard for easy of maintenance.
The steel stand was an absolute necessity with the new aquarium. For almost six years, the 280g reef was supported with 2x6 boards and two sides were blocked by the wall. This time, full access was my goal, from all four sides. Steel takes less space, is stronger and looks nicer.
The local fish store by my house began using sleek steel stands for his display tanks and when it was time to design the 400g, I knew just whom to call. The welder had quite a bit of experience since he'd already built a number by then. I asked him to meet me at my home to explain what I was trying to accomplish. I also explained that I was going to want a removable walkboard that would slide into place from the front or the back of the tank whenever desired.
Determining the size of the stand was quite the mathematical challenge. From the builder of my tank, I knew the exact footprint including the plastic trim, but I wasn't positive how tall I wanted it to be. I like tall stands because you can comfortably view the aquarium while standing, rather than having to stoop over to look at the livestock. I had to take into account the height needed by the protein skimmer, the thickness of the base of the sump with the foam sheet beneath it, access to get the collection cup off, and then how much space would remain for the lights hanging above the reef. Initially I thought 40" tall would be best, but after running the numbers and considering that the 8' ceiling was the limitation, I decided two things: The stand needed to be 38" and the sump was going to fit within the frame of the stand, flat on the slab.
When I placed my order with the welder, I reminded him that the walkboard couldn't be the full 7' length because of the wall that would butt up against the left end of the aquarium when accessed or viewed from behind. And that was without a wall even built yet! I knew where it was going to go, and how thick the wall would be, and armed with that information he got started.
When he arrived with the stand in the back of the truck, we thought we could unload it and carry it to the backyard but it was really heavy. I had to call in reinforcements: my son. The three of us struggled to get it to the back of the house until the fishroom's concrete floor was completed. Later, four people carried it around the house and into its final position.


The stand has no gussets, and doesn't seem to need them. It has legs at the four corners, but none in the center per my request. When discussing this, the welder told me he would use 3" x 2" steel tubing for the 7' span, but later told me it was unnecessary. I didn't like the surprise change since I wasn't forewarned, but a year later every bit of it looks unaltered.
The stand is made of 1/4" steel, and was powder-coated black to match everything else. It is 85.25" x 36" x 38" in size.
The inner area of the base of the stand is 32" wide and 80" long, which had to hold the sump, top off reservoir, and external pumps.
The walkboard has a welded frame that inserts into dual square tubing that runs the width of the aquarium's stand, and a 2" x 12" board is screwed to the frame. Many guests seem fearful to step on the walkboard, but those that have tried it out are impressed by its strength and the convenience of being able to walk the full length of the tank to view corals from above. When I have to clean the tank, adjust the aquascaping, place corals or kill pest anemones, it is much nicer than having to work off of a step ladder, then step down to move it over a foot and repeat until done. I'd almost like to get a second walkboard so I have one on either side for those days when I'm proactively motivated to work on the tank.
The walkboard is somewhat heavy and I do have to be very careful not to damage anything when carrying it or attempting to insert it into place, but that's just part of having it as an option rather than a permanent fixture. When I don't want it in the way, I can put it behind the door in fishroom and walk around the tank unfettered. When it's installed, I find that it works great as a place to put things down, do water tests, lean my elbows upon it during photography, and jot down plans as if it were a desk. I'm able to duck under it to get to the sump from either side, but with it out of the way such tasks are less claustrophobic. Plus I don't have to worry about bumping my head when I stand back up.
I'm planning to get some woodwork up eventually, and each panel will hold to the stand with magnets. Whenever I need to gain access, the panels will pop right off and be set aside. It'll be cherry wood... I'd like to get this done during 2013.
If there's a downside to the stand, the only thing I'd say is that the tank manufacturer won't offer their warranty because I didn't use their stand. Then again, in all the years I've been in the hobby, I've never had a warranty on my aquarium so I don't feel that's a real limitation. I asked Marineland if they farmed out steel stands to someone they trusted, but they don't. Knowing I wanted a steel stand and no other choice was acceptable, I asked for their recommendation of what to put under the tank, ie. plywood and rigid foam. They told me to use 3/4" plywood, which I affixed with 3M doublestick tape. This prevented the plywood from shifting when the tank was slid into place, and allowed for a little give if things shift over time. The plywood is the cushion between the glass (and trim) and the rigid steel frame. The plywood was sealed with black paint to avoid water damage and help it blend in.

Here's a picture a minute after the 400g was placed on it, back when the fishroom was still under construction with livestock in vats.


Great stand!
When it came to leveling the stand, I used composite shims. Two 15 ton jacks and some 4x4 posts helped me work it to the exact spot and later to level the water line.

Here's the video of it in action:


