Vortech Battery Backup Surgery
I had to do surgery: Vortech Battery Backup Surgery. ;) That involved drilling out the rivets, reorienting the battery, riviting the aluminum case shut again and mounting it on the wall.
This is what it looked like before I began.
And the wire the feeds the pump during a power failure.
That dangling wire was a danger. When I step up on the walkboard behind my tank, I usually grab hold of the doorway and didn't want to ever snag that wire. I definitely didn't want to work around it, not even once. Because I couldn't move the Battery nor the Driver, it had to alter the orientation of the battery's plugs to get a few more inches of wire.
This next part is unrelated to the project itself. If you want to invert your battery backup, just skip this next segment.
FYI: IceCap told me that you can run this Battery Backup right side up, or inverted, but not on its side. So if you have one, make sure it is installed correctly. The battery is sealed, but the cells contain fluid that has to be in the right direction (or it will end up with a dry cell). The battery is locked in place within the case with metal tabs that prevent it from shifting, so there is no reason to worry that the connections will be crushed.
When I got this particular battery, the socket for the power supply was very loose. If I brushed up against the power supply cord, it would drop out. After testing the socket with a different power supply, I quickly ascertained the socket needed to be replaced. I contacted IceCap and asked that they just mail me the replacement part, rather than shipping this heavy battery with the related shipping fees and wait time. They were happy to get those out in the mail to me. I asked for two in case I damaged one during the surgery.
So here's the case with the battery removed.![]()
Using needlenose pliers, I squeezed the sides to work the fitting out of the case.
The side facing you shows a metal piece that should have had some black plastic holding it in position. This part was definitely the cause, and replacing it was simple. I needed the new part, some solder, a soldering iron, and some heat shrinking tubing.


After peeling away the heatshrink tubing, I used the soldering iron to heat each soldered wire to remove the old socket.
I had to feed the wires out of the metal bracket to have room to solder the new piece on. I slipped the heat shrink tubing over the red and black wires first, then made sure I had the part in the right orientation (matching what I saw with the defective piece), and soldered each wire to its respective leg.

Once that was done, I pressed the socket into the metal casing until it snapped into place.

The heat shrink tubing was worked up and over the newly soldered connections, and a lit match helped it shrink down snugly.

Mission accomplished. This probably took all of 10 minutes only because it was in a tight spot with very short wires.
To replace the cover, all I did was flip the battery-side upside down. With the ports facing upwards, I placed the cover so that all the holes aligned, and pressed rivets into each empty hole.
I bought this rivet set 20 years ago, and still haven't run out of rivets. LOL Riveting is easy. Put the rivet into the hole (which would hold two pieces of metal together), put the tool over the exposed aluminum pin, and squeeze the handle. Repeat when necessary.
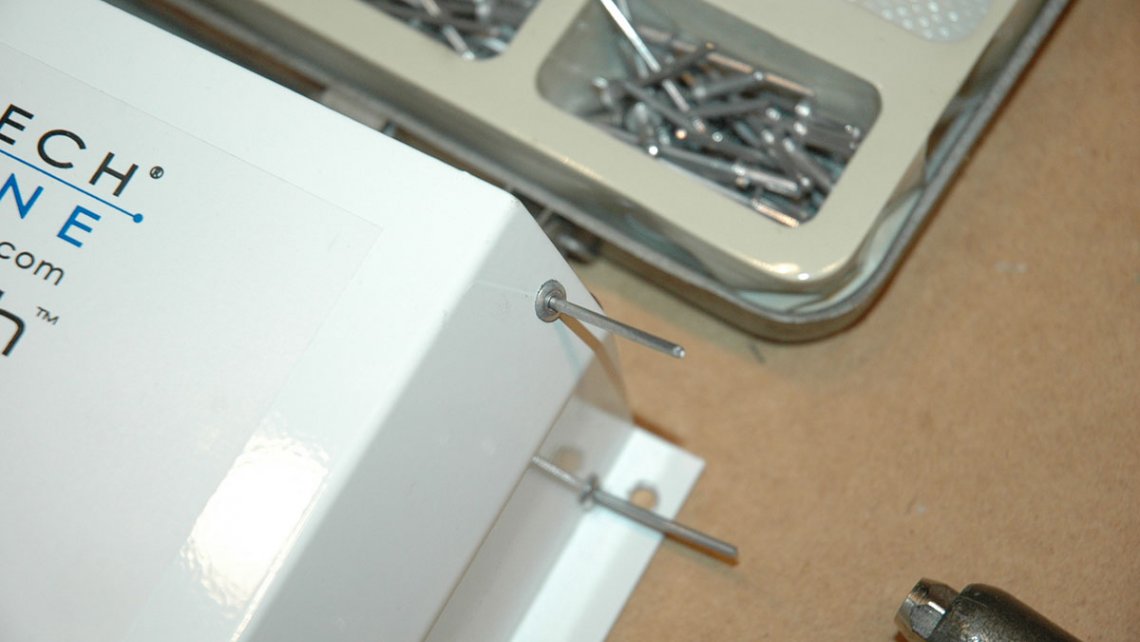
In this picture, the rivet is all the way in the hole, and the tool is pressed up against the metal completely. The handle is extended to the left.
In this picture, the handled has been squeezed down fully. With some tools, a popping sound occurs, and the tool comes off the rivet.
Not in this case. As I pull the handle back up, the pin is still visible.
Again, I press the riveting gun firmly against the metal, and squeeze once more. Now the popping sound occurs, and the rivet is locked in place, holding the cover to the frame beneath.
Once a rivet is done, open the handle on the tool and the rest of the pin will drop out. Move on to the next rivet, and repeat. This is a very easy tool to use, only slightly more complicated than a stapler.
Here is the finished product with the ports facing up as planned. Note the pins lying around the workbench.
The battery is reinstalled on the wall, and the power supply and 12v lead are plugged in.

It may not be pretty, but at least I won't snag it when working around the tank.